
Make sure that you have the latest version of WordPress installed.
Upload Deus theme to WordPress in one of two different ways
-Extract the deustheme.zip and upload the extracted folder to the /wp-content/themes/ directory on your server.
– Or go to Appearance > Themes and click on the Install Themes tab at the top. Then click Upload and select deustheme.zip and click Install Now.
After you upload the theme, activate it by going to Appearance > Themes and click Activate underneath DEUS screenshot.
XML Data
The DEUS theme comes with dummy content via an XML file. This file includes dummy posts, pages, menus, tags, categories, one dummy photo and two dummy ads. To install the XML data, go to Tools > Import, click on WordPress then select the deus.xml file located in the XML Data folder of your original zip file. Then click Upload file and import. Choose a user to assign the posts to and make sure you click the Download and import file attachments checkbox and then click submit.
Theme Options
DEUS comes with a plethora of custom theme Options that allow you to play with the design and the layout without touching the code. To edit the Theme Options, go to Appearance > Customize.
Site Title, Tagline and Footer Copyright Text
– This is where you set your site title, the tagline or slogan and the copyright text in the footer. Pretty much self explanatory.
Logo Options
– This is where you upload your logo and determine it’s position, whether you want it on the left side of the header or in the center. Aditionaly you can upload a favicon and an apple touch icon for your site, and a smaller version of the logo that will appear on the floating menu. Logo should be 270×90 PNG image, while the favicon should be 16×16 PNG/GIF image. Apple touch icon should be 129×129 PNG/JPG. And the smaller version of the logo should be at least 100×36 PNG/JPG.
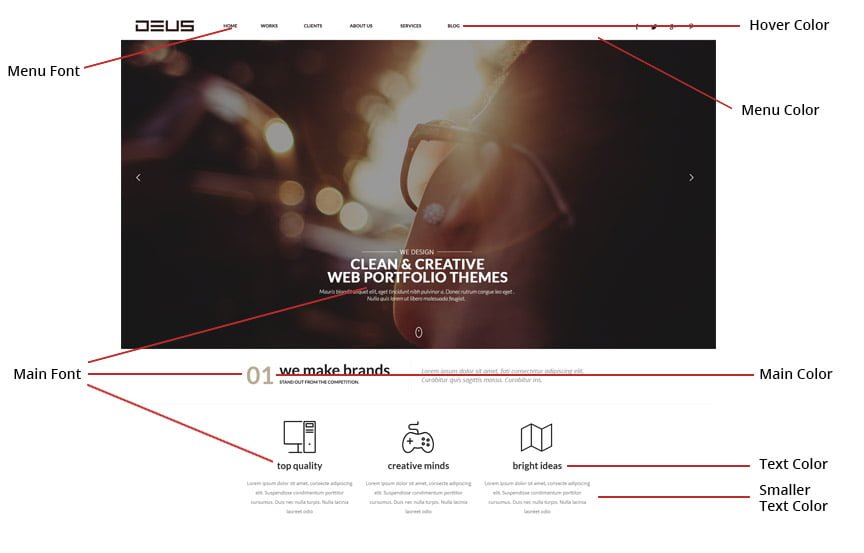
Theme Colors & Design
– Menu Background & Menu Font Color & Menu Hover Color: : Here you select the color for the menu background, and the color of the font on the menu.
– Main Color: Here you can change the color of the hover effect, the links on the site, the color of the font on the slider and widget titles, etc.
– Text Color:Change the color of the titles and bigger texts.
– Small Text Color: This option enables you to change the color of the smaller fonts throughout the site.
– Background Color: If you are not using an image for the background of the site, here you can determine the color of the background.
– Images Size:Here you can select the size and resolution of the images, like retina or even 4k. If you change this option remember to reupload the images with proper size.
– Body Width:Here you determine the width of the body element. You can go from Full width down to 50%. If you make changes to this option, remember to reupload your images with proper size, or use the regenerate thumbnails plugin.
– Homepage Widget Title Style:You can select from 3 different styles of widget titles here.
– Menu Font:This is the font for the Menus only.
– Menu Font Size:This is where you select the size of the font in the menu.
– Menu Font Weight:This is where you bold/unbold the font in the menu.
– Main Font:Where you select the font for your site. The main font is present all throughout the site.
– Menu Follow with Scroll:Here you can toggle on/off the option for the menu to follow as you scroll.
– Sidebar Widget Title Style:You can eselct from a couple of styles for widget titles, but only for the widgets that can be placed in the sidebar on the category page or post page.
– Slider Transition:The transition of the slider images can be selected here. You can select from 9 different transitions.
– Widget Load Effect:Here you can set up the way that the widgets load.
- Post Page Options– Featured Media Size: here you set up the width of the post page media, whether it is an image or a video. You can make it 2/3rds of the page, or full width.– Content Font Size: This is where you determine the font size of the post page body text.– Title Uppercase: Here you select from all uppercase text of the title of posts, or normal text.– Share Buttons: Display on or off the share buttons on the post page.– Post Tags: Display the tags on the post page.– Comments: Turn on or off the comments on the post page.
– Author-box: Turn on or off the author box.
– Navigation Links: Wheteher to display the next/previous post on the post page.
- Category– Number of Posts: Determine how many posts should be visible per page, on the category page.
- Translate– If your websites language is not English, this is where you set up the translation. There are a few words throughout the site like read more, search, share, etc.. that you might want to translate to your language.
- Social Settings– This is where you fill in your social accounts. Just type your username/handle under the appropriate social media platform, and the rest will take care of itself.
- Tracking– This helps you set up ads and keep track of statistics. Simply copy and paste the code here.
- Navigation– Deus has one menu. Here you choose where to display the menus you have created. See the screenshot below for reference. Select which menu appears in each location. You can edit your menu content on the Menus screen in the Appearance section.
Widgets and Widget Areas
Deus comes packed with 14 custom widgets you can use anywhere on the homepage. To activate a widget, go to Appearance > Widgets and drag and drop a widget from the Available Widgets box to theo homepage widget area. Or you can do the same by going to Appearance>Customize where you can see the widgets area at the bottom of the menu. This way you can see the widgets in the live preview right away.
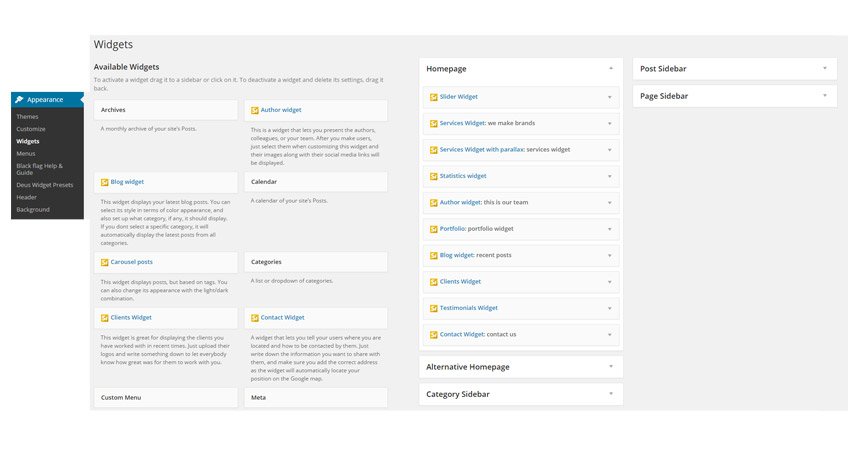
Widget Descriptions
Like we mentioned before, you can place any widget anywhere. Feel free experimenting with your layout, or use one of the suggested layouts we have already made.
- – Slider WidgetThis is the main slider widget. It can display images in full width, or normal standard width. You can add a title and text to it, and also a link, if you want it to link to somewhere.
- – Services WidgetThis widget is ideal for diplaying the services you offer. You can set in how many columns should the services appear, and you can add as many as you want.
- – Services Widget with ParallaxJust like the previous widget, this on is also ideal for displaying services. You can set it to 2,3 or 4 columns and also add an image for the parallax.
- – Statistics WidgetThis widget can display statistics numerically. Great for letting your users know how many projects, hours, awards, etc. you have behind your belt.
- – Clients WidgetThis widget is great for displaying the clients you have worked with in recent times. Just upload their logos and write something down to let everybody know how great was for them to work with you.
- – Contact Us WidgetA widget that lets you tell your users where you are located and how to be contacted by them. Just write down the information you want to share with them, and make sure you add the correct address as the widget will automatically locate your position on the Google map.
- – Authors WidgetThis is a widget that lets you present the authors, colleagues, or your team. After you make users, just select them when customizing this widget and their images along with their social media links will be displayed.
- – Blog WidgetThis widget displays your latest blog posts. You can select its style in terms of color appearance, and also set up what category, if any, it should display. If you dont select a specific category, it will automatically display the latest posts from all categories.
- – Carousel WidgetThis widget displays posts, but based on tags. You can also change its appearance with the light/dark combination.
- – Portfolio WidgetThie portfolio widget like the name suggests its best utilised when using it to display your latest projects. You can add more categories to it, and a menu will appear that will let the user select what projects of yours he wants to view.
- – Single Item WidgetA simple widget that displays a single item with image and text. You can link to a post of yours, or to an external link, its all up to you. You can also select its orientation, left, right or center.
- – Testimonials WidgetThis is a perfect widget to display all the testimonials you have collected from your clients. Upload an image, share the text and let people know how satisfied your customers are from your work. Also you will need to upload an image as this widget also comes with its own parallax.
- – Thumbnails WidgetAnother way to display your latest posts from your blog, or categories. Just select the category, or leave it to show all categories and the widget will display your latest posts with small thumbnails.
Images
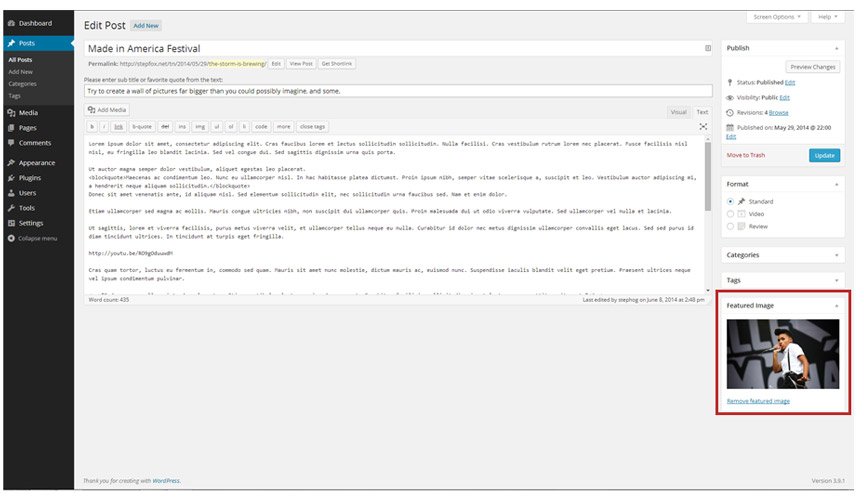
DEUS uses WordPress’ built-in featured image feature to handle image management.
To set the featured image for a post, go to Posts > Add New (or edit an existing post) and click the set featured image in the featured image box. If the desired image is not already uploaded simply click on upload image and then select one and click set as featured image. DEUS theme will take care of the rest in generating the smaller thumbnails that show up in the various places around the site.
Videos
DEUS uses WordPress’ built-in featured video feature for easy video management. When creating a post, select video under Format options and then simply copy the video link and paste it in the Featured Video area.

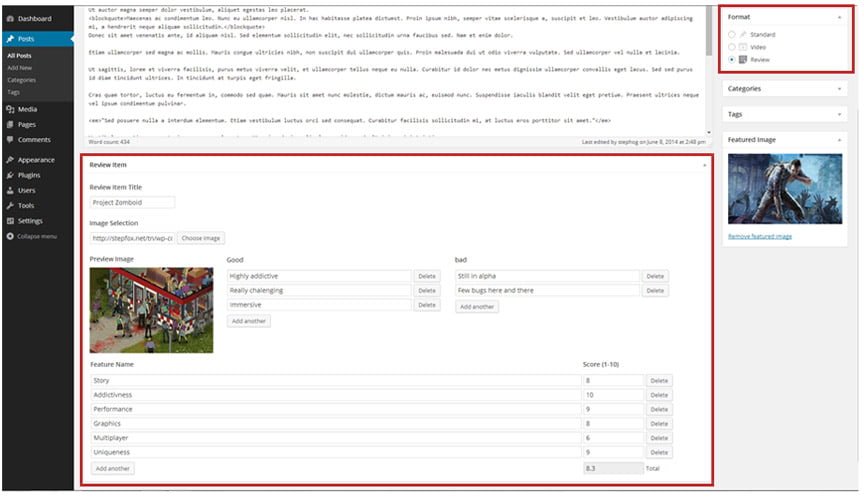
Reviews
Its really easy to set up a review post. Just like the video post, all you need to do is, select review from the format options on your post page. Once you do that, new options will appear under the text area. Here you can upload the image and give the name of the subject your are reviewing, and add a few short pros and cons to it (good and bad). Also here you add how many parameters the subject will be reviewed on, and what numbers it scores on each on it. The total amount of the scores will be summed up and shown over the image.
Gallery
You can easily set up galleries on your post page as well. Just select the post format as a ‘gallery’ and the gallery field will open up, where you can upload the images that you want to be present in the gallery.